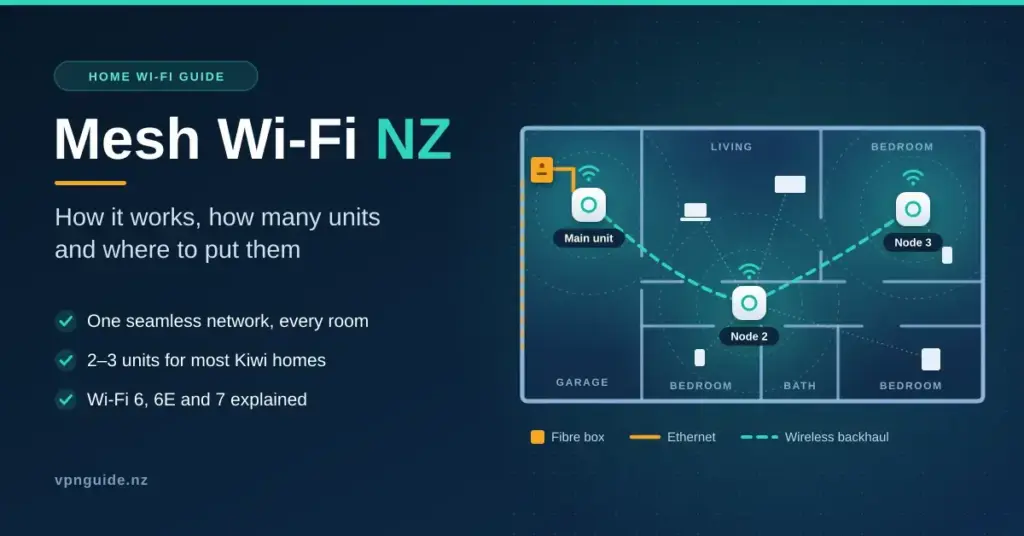
A mesh Wi-Fi system swaps the single modem that tries to light up your whole house for two or more small units that work together as one network. For many New Zealand homes — long single-level floor plans, the fibre box bolted to a wall in the garage, brick or block construction and foil-backed insulation that reflects radio signals — mesh is the most dependable way to carry full fibre speeds into every room. This guide explains what mesh is, how it actually works, how the Wi-Fi 6, 6E and 7 standards differ here, how many units a typical Kiwi home needs, where to put them, and how to run mesh alongside the modem your provider gave you.
Quick facts
- What it is: two or more units that form one seamless Wi-Fi network across the house.
- Best for: larger, longer or multi-level NZ homes, brick or block builds, and busy multi-device households.
- Typical units needed: two for most single-level homes; three for large, long or two-storey houses.
- Fastest backhaul: wired Ethernet, then tri-band wireless, then dual-band wireless.
- Standards: Wi-Fi 6 (best value), Wi-Fi 6E (adds clean 6 GHz), Wi-Fi 7 (adds 320 MHz channels and Multi-Link Operation).
- 6 GHz in NZ: lower band (5925–6425 MHz) open for Wi-Fi since August 2022.
- Golden rule: turn off the provider modem’s own Wi-Fi so you do not run two competing networks.
What mesh Wi-Fi is and how it works
A mesh system is a set of matched units — sometimes called nodes or satellites — that broadcast a single network name (SSID) and password. One unit connects to your modem, or replaces its Wi-Fi entirely, and the others sit in other parts of the house. As you carry a phone or laptop from room to room, the system quietly hands the device to whichever unit has the strongest signal, so you stay connected without switching networks or watching a video stall in the hallway.
The invisible link that carries traffic between the units is called the backhaul, and it is the single most important thing to understand about mesh. Every byte a far-room device sends has to travel back to the main unit and out to the internet, so a weak backhaul caps the speed of every device attached to that satellite — no matter how strong the signal in the room looks on your phone.
This is why mesh is genuinely different from a Wi-Fi extender. A simple extender just repeats the router’s signal, and because it usually receives and rebroadcasts on the same channel, it can halve the speed of everything connected to it. A mesh system is built as one coordinated network: the units share a single name, hand devices between themselves intelligently, and — on tri-band or wired setups — keep the backhaul on its own dedicated path so your speed holds up as you move through the house.
| Backhaul type | How it works | Speed in the far rooms |
|---|---|---|
| Dual-band wireless | The units share the same 2.4 and 5 GHz radios for your devices and for talking to each other | Acceptable, but drops with each extra hop as the radio splits its time |
| Tri-band wireless | A third, dedicated radio carries only unit-to-unit traffic, leaving the other bands free for devices | Much better; devices keep the full use of their own radios |
| Wired (Ethernet) | The units are joined by a network cable instead of radio | Almost the same as standing next to the main unit |
If your house already has Ethernet wall ports, or a cable can be run through the ceiling or under the floor, wired backhaul is the biggest single upgrade you can make. It lets even an entry-level, dual-band mesh perform like a premium tri-band one, because the units no longer waste any radio time talking to each other. Where a cable is impossible, a tri-band system is the next best thing.
Wi-Fi 6, 6E or 7 — which standard do you need?
Mesh systems are sold by their Wi-Fi generation. The newer the standard, the more it can do, but also the more you pay — and in a home the connection to the internet, not the Wi-Fi, is usually the real ceiling. The Wi-Fi generations are defined and certified by the Wi-Fi Alliance, the industry body behind the “Wi-Fi CERTIFIED” logos.
| Standard | Bands it uses | Who it suits |
|---|---|---|
| Wi-Fi 6 (802.11ax) | 2.4 and 5 GHz | Fibre 100 and Fibre 300/500 homes; the best value for most people |
| Wi-Fi 6E | Adds the clean 6 GHz band | Busy apartments and suburbs where the 5 GHz channels are crowded with neighbours |
| Wi-Fi 7 (802.11be) | 2.4, 5 and 6 GHz, with Multi-Link Operation | Fibre Max and Hyperfibre homes, heavy simultaneous users, and future-proofing |
Wi-Fi 7 adds several genuine improvements over Wi-Fi 6E: wider 320 MHz channels in the 6 GHz band, denser 4096-QAM signalling, and Multi-Link Operation (MLO) — the ability for a device and a unit to send data across two bands at once (for example 5 GHz and 6 GHz together), which lowers lag and adds reliability. Those are real gains, but most of them only show up when both the wireless and the internet connection are already very fast. For a Fibre 100 or 300 plan, a good Wi-Fi 6 mesh will deliver every megabit your line can carry.
What the 6 GHz band means in New Zealand
New Zealand opened the lower part of the 6 GHz band (5925–6425 MHz) for Wi-Fi in August 2022, under low-power indoor and very-low-power rules set by Radio Spectrum Management. The regulator chose not to release the upper portion (6425–7125 MHz), matching the approach taken in Australia, the UK and Europe. In practice that still gives Wi-Fi 6E and Wi-Fi 7 gear a clean, uncrowded band with plenty of channels — but 6 GHz signals fade faster through walls than 5 GHz, so units that rely on the 6 GHz band need to sit a little closer together to keep a strong link.
Mesh systems sold in New Zealand
New Zealand retailers stock mesh ranges from TP-Link (Deco), ASUS (ZenWiFi), NETGEAR (Orbi) and Amazon (eero), usually in two- and three-packs. They run from affordable Wi-Fi 6 kits such as the TP-Link Deco X55, through Wi-Fi 6E systems like the Deco XE75 Pro, up to Wi-Fi 7 flagships such as the Deco BE85 and NETGEAR’s Orbi 800/900 series. Independent buying guides such as PB Tech’s mesh round-up and the JB Hi-Fi Wi-Fi 7 range are useful for seeing what is currently in stock and at what price. Providers also supply mesh directly: One NZ, for example, ships the Wi-Fi 7 TP-Link Deco BE28 on its fibre plans, and adding another unit of the same system is always the simplest way to extend coverage. Prices move constantly, so compare current listings rather than trusting any figure printed in an article — including this one.
Mesh system comparison
| System | Wi-Fi standard | Bands | Best suited to |
|---|---|---|---|
| TP-Link Deco X55 | Wi-Fi 6 (AX3000) | Dual-band | Fibre 100–300 homes wanting the best value |
| TP-Link Deco XE75 Pro | Wi-Fi 6E (AXE5400) | Tri-band | Crowded apartments needing the clean 6 GHz band |
| TP-Link Deco BE85 | Wi-Fi 7 (BE22000) | Tri-band | Hyperfibre homes and heavy users, with 10G ports |
| ASUS ZenWiFi BD4 | Wi-Fi 7 (BE3600) | Dual-band | Affordable entry into Wi-Fi 7 with app controls |
| NETGEAR Orbi RBK853 | Wi-Fi 6 (AX6000) | Tri-band | Large homes wanting strong wireless backhaul |
| NETGEAR Orbi RBE772 | Wi-Fi 7 (BE11000) | Tri-band | Future-proofing on Fibre Max and Hyperfibre |
| Amazon eero 6+ | Wi-Fi 6 (AX3000) | Dual-band | Simple, hands-off setup for smaller homes |
Links point to each maker’s official product pages. Systems, specifications and prices change often — check current retailer listings before buying.
How many units, and where to put them
More units is not automatically better — a badly placed satellite can drag the whole network down. Start small, measure, and add only if a room genuinely falls short.
- Begin with two units for a typical three- or four-bedroom single-level home. Step up to three for large, long or two-storey houses, or where the walls are brick, block or concrete.
- Place the second unit about halfway between the main unit and the far rooms — out in the open, up off the floor on a shelf, and never shut inside a cupboard or media cabinet.
- Keep a clear line of sight where you can. A signal down an open hallway beats one forced through two tiled bathrooms or a brick chimney.
- Read the app. Every mesh brand’s app shows the connection quality between units — usually labelled “good”, “fair” or “poor”. If it reports a weak backhaul, move the satellite closer to the main unit until it recovers.
- Avoid interference. Keep units away from microwaves, cordless phone bases, baby monitors and large metal appliances, all of which can disrupt the 2.4 and 5 GHz bands.
Using mesh with your provider’s modem
Most mesh systems simply plug into a spare LAN port on the modem your provider supplied, and take over the Wi-Fi from there. The one rule that matters is to turn off the modem’s own Wi-Fi (or put the modem into “bridge” or “modem-only” mode) so you are not running two competing networks in the same house. If you are unsure which box does what, our modem versus router guide explains the difference in plain terms, and the Spark Wi-Fi guide walks through a typical provider setup.
On fibre, many mesh systems can go one step further and replace the modem entirely, connecting straight to the Chorus fibre box (the ONT) on the wall. That usually needs your provider’s VLAN setting — most New Zealand fibre providers tag traffic on VLAN 10 — plus the DHCP or PPPoE login details, all of which are published on the provider’s “bring your own modem” page. One NZ documents this on its supplied-modem page. If your router does not support VLAN tagging, keep the provider’s modem in place and let the mesh handle the Wi-Fi behind it.
Watch out for double NAT
Leaving the provider modem as a full router and adding a mesh router behind it creates “double NAT” — two devices both handing out addresses. It usually still works, but it can break some online games, video calls and remote-access tools. Putting the modem in bridge mode, or the mesh into “access point” mode, avoids it. The mesh app will normally warn you if it detects a double-NAT situation.
Setting up a mesh system, step by step
Modern mesh systems are designed to be set up from a phone app in under half an hour. The exact wording differs between TP-Link Deco, ASUS ZenWiFi, NETGEAR Orbi and eero, but the flow is almost identical.
- Install the app and create an account. Each brand has its own app, which you will use for setup, monitoring and firmware updates. Have your Wi-Fi password decisions ready.
- Connect the main unit. Plug it into a LAN port on your provider’s modem with the supplied cable, then power it on and wait for its light to settle.
- Disable the modem’s Wi-Fi. Log into the provider modem and switch its wireless off, or set it to bridge mode, so only the mesh broadcasts a network.
- Add the satellites. Follow the app to add each extra unit. Place it first, then let the app confirm the backhaul is strong before you move on.
- Name the network and set a passphrase. Use one long, unique password; the units share it automatically, so every device roams seamlessly.
- Run a speed test on each unit. Stand in the far rooms and check you are getting close to your plan’s speed. If a room lags, nudge the nearest unit closer to the main one.
If your home has Ethernet in the walls, plug each satellite into a wall port during setup and enable wired backhaul in the app — it is the surest way to carry full speed to the far rooms, and most systems switch to it automatically once they detect a cable.
Common mistakes to avoid
- Stacking units too close together. Two nodes in the same room give you one strong bubble and one dead end. Spread them out.
- Hiding a unit in the TV cabinet. Solid wood, glass doors and clustered electronics all sap the signal. Keep units in the open.
- Chasing Wi-Fi 7 for a Fibre 100 plan. The Wi-Fi is rarely the bottleneck on an entry-level line; the money is better spent on wired backhaul.
- Ignoring the wired result. If a device plugged straight into the modem is also slow, the problem is the connection, not coverage — mesh will not fix it.
- Running two Wi-Fi networks at once. Forgetting to disable the modem’s Wi-Fi leaves devices bouncing between a strong and a weak network.
Securing your mesh network
A mesh network is only as safe as the way it is set up. Once the units are placed and working, take five minutes to lock it down: choose a long, unique passphrase rather than the sticker default; turn on WPA3 encryption if every device supports it, or the mixed WPA2/WPA3 mode if some older gear does not; and change the admin password used to log into the app or web dashboard, which is separate from the Wi-Fi password. Keep the firmware set to update automatically — mesh vendors patch security flaws through the same app you set the system up with — and use the built-in guest network for visitors and smart-home gadgets so they never touch your main devices.
Is mesh worth it, and who it suits
Mesh earns its place when a wired speed test matches your plan but the Wi-Fi in parts of the house does not. That is the classic sign of a coverage problem rather than a connection problem. If only a single room is weak, you may not need a full mesh at all — a single extender can be enough, and our Wi-Fi extender guide covers when that is the smarter buy, while the broader Wi-Fi booster guide compares every option side by side. If your wired result is also poor, fix the connection first; our slow-internet guide is the place to start.
Mesh suits larger and multi-level homes, houses built from signal-blocking materials, and households with lots of devices streaming and calling at once. It is overkill for a small apartment where one good router already reaches every corner. Rural households on fixed-wireless or satellite services — such as Starlink broadband in New Zealand (see the Starlink overview for background) — still benefit from mesh indoors: the satellite dish or fixed-wireless modem brings the connection to one point, and mesh spreads it through the house exactly as it would on fibre.
Disclaimer. This is general information only. The model names above are examples of products sold in New Zealand, not endorsements, and we do not lab-test networking hardware. Standards support, availability and prices change often — check current retailer and provider listings before you buy.
Sources
Frequently asked questions
What is mesh Wi-Fi?
Mesh Wi-Fi is a set of two or more units that act as a single network, sharing one name and password. As you move around the house, your device is handed to whichever unit has the strongest signal, so coverage stays even from room to room.
How many mesh units do I need in a New Zealand home?
Two units cover most single-level three- or four-bedroom homes. Choose three for large, long or two-storey houses, or where the walls are brick, block or concrete. The mesh app tells you whether two units are placed too far apart.
Is Wi-Fi 7 mesh worth it in New Zealand?
For Fibre Max and Hyperfibre plans, or if you want gear that lasts several years, yes. For Fibre 100 to Fibre 500, a Wi-Fi 6 or 6E system delivers the full speed of the plan for a lot less money, because the connection, not the Wi-Fi, is usually the limit.
Can I use a mesh system with my Spark or One NZ modem?
Yes. Plug the main unit into a LAN port on the provider modem and turn off the modem’s own Wi-Fi so the two networks do not compete. On fibre, some mesh systems can also connect directly to the Chorus fibre box using the provider’s VLAN setting.
Does the 6 GHz band work in New Zealand?
Yes. The lower 6 GHz band (5925–6425 MHz) has been open for Wi-Fi since August 2022, so Wi-Fi 6E and Wi-Fi 7 gear can use it. It is fast and uncrowded but has a shorter range than 5 GHz, so 6 GHz units need to sit closer together.